Comprehensive Newbies Guide to HKO
From Hello Kitty Online Wiki
So you want to play Hello Kitty Online? This guide will show you how!
How to download
Click here and follow the instructions.
Note: With the exception of the Founder's Beta client, if you have an existing HKO client from Europe, Aeria, or South-east Asia, you DO NOT need to download HKO again. Your client will automatically patch.
Please make sure you have enough room and that your system is up-to-date by checking the system requirements.
I've downloaded and Installed HKO, now what?
Now you double click the HKO AutoUpdate icon that should be on your desktop. ![]()
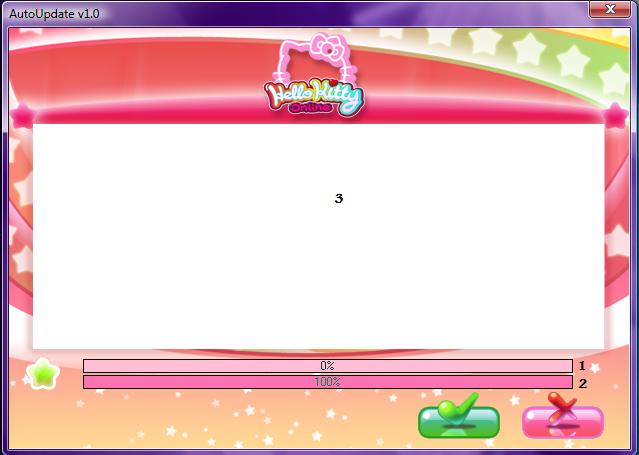
You should then get a screen that looks like this:
- This is the update bar. When there is a patch/update it will slowly be moving to 100%. If there is no patch/update it will stay at 0%.
- If this is at 100% it means you have all the latest patches/updates. If it isn't, then the #1 bar should be moving.
- This will be filled with the latest HKO announcements.
Please note that when you move your mouse over the checkmark and 'x' your mouse icon does not change. As long as the checkmark is green, you can click it and get into the login screen (it'll be grayed out if you can't).
I've run AutoUpdate and clicked the checkmark, now what?
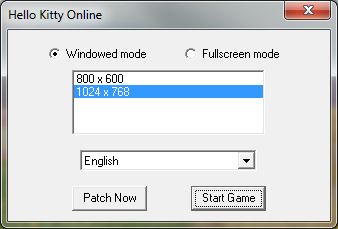
Once you've clicked the checkmark, you'll be taken to this screen:
If this is the first time you've downloaded HKO, or if a lengthy period of time has elapsed since the last time you've run AutoUpdate, it is highly recommended that you click "Patch now". This will download a set of different patches than what AutoUpdate installs. While the game will patch in the background while you are playing, you may find yourself unable to access farms or certain towns until the background patcher has finished.
Depending on the version you've downloaded, you may or may not see the language options. Also depending on your computer hardware will dictate which screen options are available to you. If, for instance, your computer can only display 800x600, you will not have the option to run in 1024x768 mode.
You can toggle Full Screen from within the game by pressing ALT+ENTER.
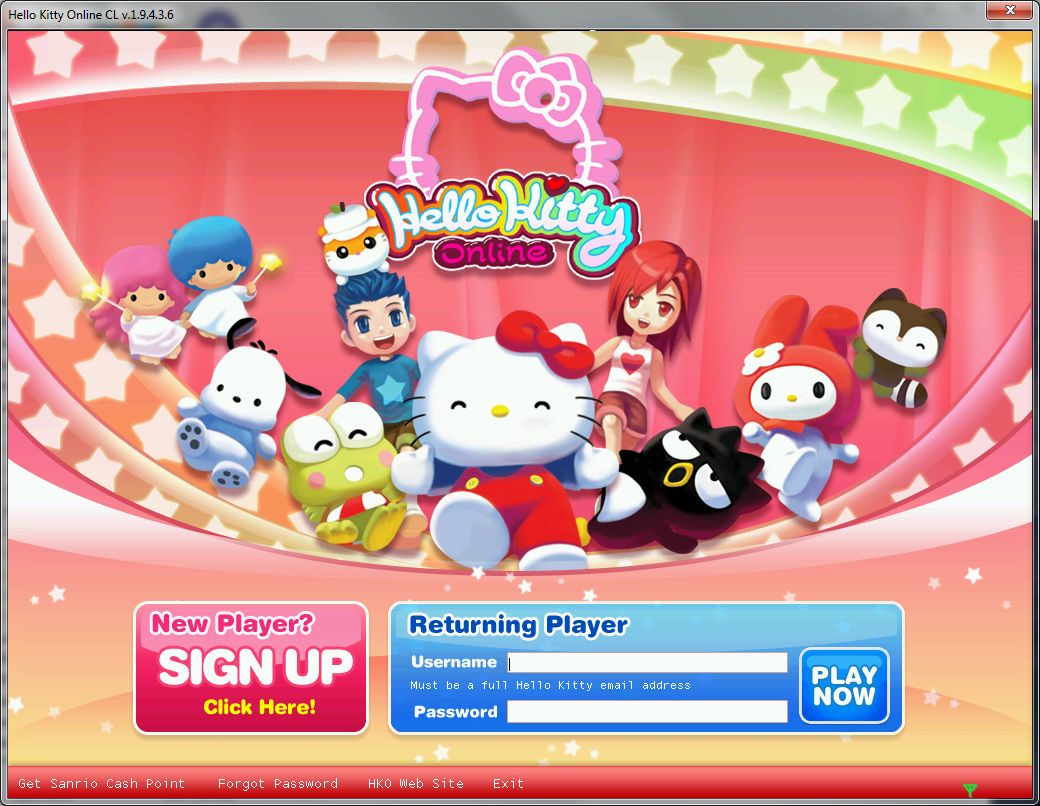
After clicking OK, you'll be taken here:
- The "New Player? Sign Up!" will take you to SanrioTown account registration page
- The Username box should be filled in with your SanrioTown account, i.e., user@hellokitty.com
- The password is the same as your SanrioTown password
At the bottom of the screen are four links, all of which should be self-explanatory:
- Get Sanrio Cash Point
- Forgot password
- HKO Web Site
- Exit
Choose a Server/Channel
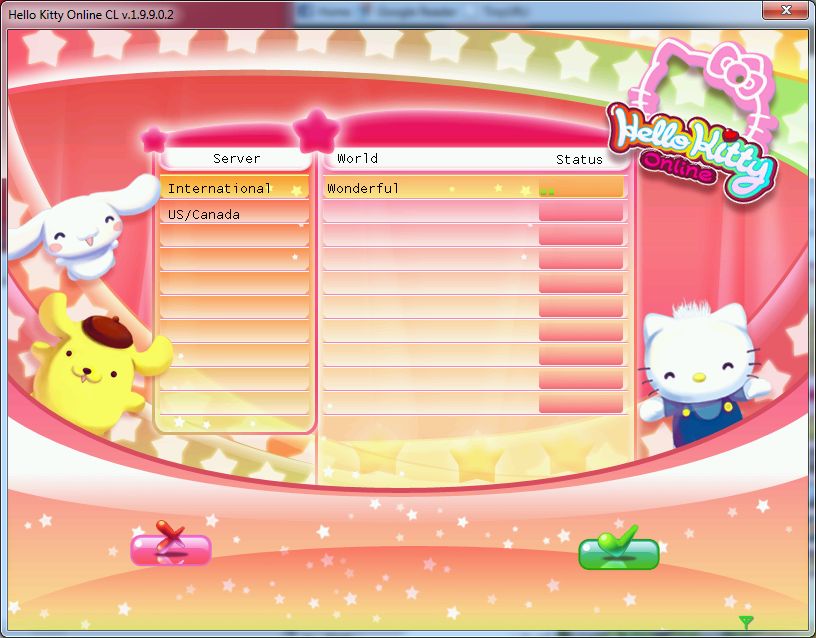
Once you've logged in, you will see the Server selection page screen:
- The International is the combined European (EU) and South-east Asia (SEA) server.
- The US/Canada server is comprised of only the Magical server
The Status indicators next to each Realm show how populated the server is at that moment.
Creating a your character
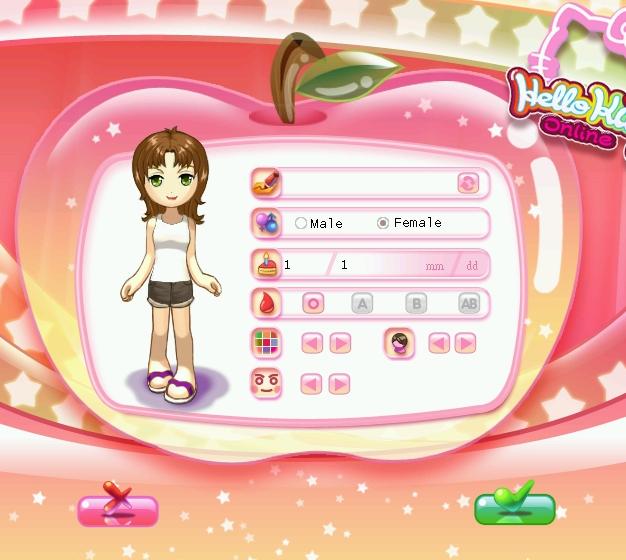
On this screen you will be able to design your character's initial look. You will be able to further customize your character as you play the game.
- Character Name: Create a name for your character. Once chosen, this cannot be changed.
- Sex: Choose whether you wish your character to be male or female. Once chosen, this cannot be changed.
- Birthday: Select a birthday for your character. Once chosen, this cannot be changed.
- Blood Type: Chooses character blood type. Once chosen, this cannot be changed.
- Skin: Choose a skin tone for your character. Skin tones can be changed by purchasing items in the Item Mall.
- Hair: Choose a hairy style and color. Hair may be changed from various in-game vendors as well as the item mall.
- Eyes: Choose an eye type.
- Cancel (red X):This cancels the character creation and takes you back to the login screen.
- Select (green check): When you have finished creating your character click this button to start the game!
Beginning in the Dream Room
The Dream Rooms are a series of four tutorial rooms, intended to give you a basic understanding of movement and interaction. Please do not skip the Dream Rooms, because you acquire a special achievement, called Pure Dreams, for completing this tutorial.
Once you've completed all four rooms of the Dream Room, you may exit to Sanrio Harbor, or the Dream Carnival. It is also recommended that players continue to the Dream Carnival, as it is an expansive single-map zone which has many quests and unique rewards, as well as helping to fill in two Collections: the NPC Encyclopedia and the Pure Dream collection.
Basic Controls
Left clicks are the movement controls. Right-clicks are context-sensitive action controls. Depending on what you right-click on, you may have a variety of options:
- Right-clicking on NPC's to talk to them or to buy from vendors,
- Right-clicking portals to move to a new map/zone,
- Right-clicking on monsters to attack them.
- Experiment with other right-clicks to find what other options you may have.
Right clicking on another person gives you this menu:
From left to right:
- Info displays some basic information about the person you are looking at.
- Add Buddy adds a person to your friends list. No confirmation is necessary.
- Trade prompts the other player to begin a trade transaction with you.
- Follow will attempt to follow that person
- E-mail opens a window which allows you to write an e-mail to that person.
- Blog opens a window to that person's SanrioTown blog.
- Video opens a window to that persons movies which have been posted on the DreamStudio.
Similar options are available when you right-click on yourself.
Health and Stamina
Health is referred to as energy and stamina is referred to as action points. The phrases are interchangeable. The User Interface will show you your Health and Stamina meters. They are very important tools because if you stamina gets too low you'll have to wait a bit before getting more resources. And if your health reaches ZERO, you'll be sent to the nearest playground to take a break. So remember to bring nutritious food to heal yourself. You can see the status at the upper left:
Chatting
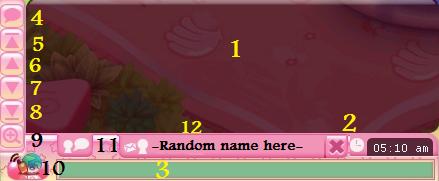
1. Chat display. Text shows here. 2. Server time. Hovering over this will also display the local time. 3. Text bar. Type your text in here. 4. Chat Filter. Clicking this gives you this:
Unchecking these means that you will not be able to see the text from that particular channel. Ex: If you only wanted to hear the chat of your Guild members, you would uncheck everything but the middle one, and you'd not see any other text but your guild's.
5. Jumps to the top of the chat display. 6. Scrolls up one line of text in the chat display. 7. Scrolls down one line of text in the chat display. 8. Jumps to the bottom of the chat display. 9. Increases the height of the chat display. Click multiple times to make it disappear and return to normal. 10. Channel changer. Clicking on this gives you:
From top to bottom:
- Party Channel. Only members in your party will see this chat. This is a light-green color.
- Map Channel. All people on the same map will see your chat. Yellow chat text.
- Normal (local) Channel. Only people within visible range will see your chat. White chat text.
- Guild Channel. All guild members, even across the three Realms of the International Server, will see your chat. Darker green color.
- Trade Channel. Similar in scope to map channel. Orange chat text.
- Assistance Channel. Appears to be undeveloped, has the same scope and color as Map chat.
- Private Message. This will pop open a text input for you to type the person to whom you wish to chat. The spelling and capitalization are important. The private message opens a new tab to the right of the normal chat tab at the bottom.
Shortcuts for changing the Chat Channel
Typing /m "Your Message" will change your channel to Map chat and then your message will appear on map chat. Until changed, all subsequent chat text will be on this now-default channel.
- /m = Map Channel
- /l = Normal (Local Chat)
- /p = Party/Group Channel
- /t = Trade Channel
- /w = Whisper.
For the /w (which is PMing someone) you must do /w *Name* "Message" with the name spelled an capitalized correctly. For example, /w player Hi!--would PM a player named "player" with the message 'Hi!'.
Private Messages
To PM a person, click the channel changer icon ![]() (to the left of the text bar), then choose the last icon.
(to the left of the text bar), then choose the last icon.
You'll then get this pop-up:
Carefully type in the name of the person you want to PM and hit OK. If the person you wish to talk to is online your chat bar should then look something like this:
![]() this will appear next to your chat display when you have a PM open. It will have the envelope flashing if you have a new message.
this will appear next to your chat display when you have a PM open. It will have the envelope flashing if you have a new message.
Hot Keys
At the top of the screen is the hotkey bar. These are numbered from left to right, 1 thru 9 and then 0. You can drag an item from your inventory into a specific slot, and then press that hotkey number to quickly access it. The item will not disappear from your inventory, it will still consume a slot, but will now appear in the hotbar.
For instance, if you dropped a stack of French Fries into the first slot, you can quickly eat food by pressing the number 1. Here is an example of a hotbar loaded with a stack of fertilizer in slot 1, and a stack of water in slot 2:
Pressing 1 would activate the fertilizer, and pressing 2 would activate the water.
- A: Opens Area Map.
- C: Opens Character Information window.
- E: Opens My Pets window.
- F: Opens Buddy List.
- G: Opens Guild window.
- H: Opens the Party window, only active while in a party.
- I: Opens Inventory.
- J: Toggles Sit/Stand
- P: Opens Production window.
- Q: Opens Quest List.
- S: Opens Skill Information window.
- W: Opens World Map.
- F11: Screenshot. Stores them in HKO install folder/screenshot
- Alt + Enter: Toggle full screen mode. This is actually a Windows command, not specific to HKO.
Pressing ENTER will the focus to chat pane's input message box, and pressing ESC will remove the focus.
Production Window
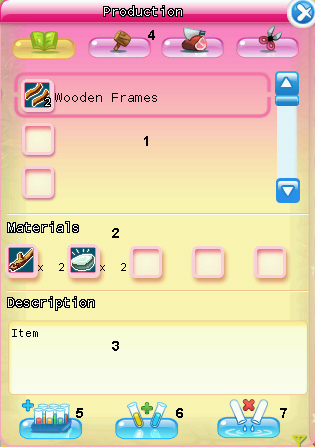
This is a window you'll use very often throughout your adventures in Sanrio Land! Begin by right-clicking any guide you receive in your inventory. After you've right-clicked on a guide, the actual book will disappear from your inventory, a status message will tell you that you've learned a new skill, and the recipes will now appear here. After pressing "P" to open the window, this is what you should see:
- This is a list of recipes you can produce.
- Once a recipe is highlighted, this will display information about the materials you need to produce the selected item.
- This is where you'll see the type of the item you're going to produce.
- Click on one of these tabs to find other types of recipes you have added to your Production window. There is Forging, Carpentry, Cooking and Tailoring.
- This is the "Produce All" button. Use this when you have enough materials to create the item more than once. You will continue producing until you run out of materials or interrupt the process.
- This is the "Produce" button. Click on this button to create your item once you have all of the necessary materials!
- The "Stop Production" button can be used in case you change your mind and would like to cancel creating the item.
Once you are done producing, you can either click the blue "X" on the top-right corner of the window, press "P" or press ESCAPE to close it.
How to Split Items
Hold Shift then LEFT CLICK on the item stack you want to split. If you right click you'll either drop it in your storage or drop it period.
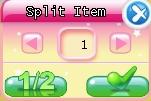
When you Shift+Left Click you'll get this message box:
Insert how much you want to split it by, and then you'll get two stacks. Hurrah. The "1/2" button is a convenient way to split stacks in half.
How to sell items
Once you've played for a while, your inventory might begin to fill up with items you don't need. You can sell items to the vendors to earn money and open inventory space. First, open your inventory, then talk to a vendor to open his inventory. You can either drag-and-drop items from your inventory into the vendor inventory, or you can right-click items in your inventory. If you right-click the item, you'll be prompted with a confirmation message asking if you want to sell the item(s). If you simply drag-and-drop the items, there will be no confirmation.
How to Trade Items
Right click the person you want to trade with. Doing so will show this bar:
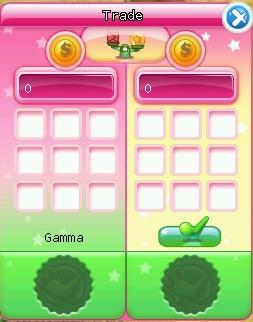
Click the trade button and this will pop up:
Drag what items you want over to the box. Once you've added all the items you want to trade click the checkmark.
Note: If you are receiving items, make sure you have enough room in your inventory before you accept the trade!
Where to find your farm
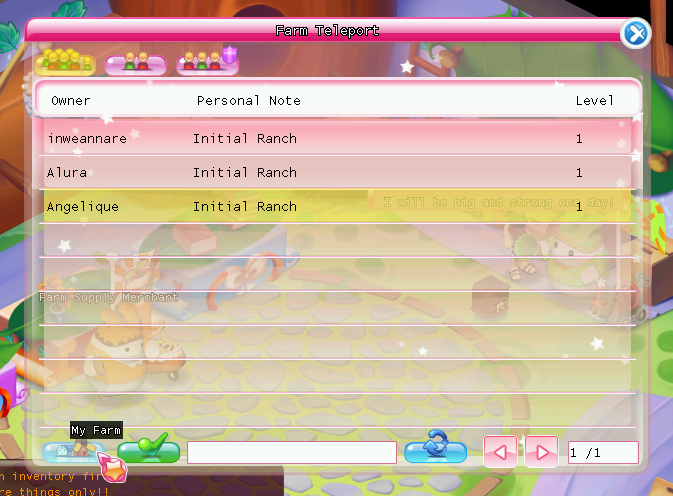
You farm is inside the Farm Market. Inside the farm market are the Farm Supply Merchant and Farm Manager. Talking to the Farm Manager will give you this:
Clicking on My Farm will take you to your farm. If you want to visit your friend's farm, just select their name from the list and click on the green check mark. Note: You can only visit your friend's farm when they are in their farms.
Types of quests
There are a variety of quests in HKO:
- Storyline quests are the main story quests, and can be identified by a red star over the NPCs head.
- Side quests are quests (or quest arcs) which are optional, but still recommended to complete, as you may be rewarded with items which you will want later. These are identified by a crescent moon over the NPCs head.
- Group quests may or may not be storyline quests, but will require that you be in a group to both accept and to turn in the quest requirements. You will not see a group quest unless you are in a group.
- Repeatable quests are daily, weekly and monthly quests given by the Materials Merchants in London and beyond. These are identified by a D, W or M over the NPC head. There are prerequisites to meet before you can accept weekly or monthly quests.
How to drop a quest
To drop a quest, simply head to the Quest Log page, buy either pressing this icon: ![]() , or pressing 'Q' on your keyboard. Once there, find the quest you wish to drop. Then click on the red 'x' mark on the side, it will ask you if you wish to drop it, click the checkmark and voila, no more quest.
, or pressing 'Q' on your keyboard. Once there, find the quest you wish to drop. Then click on the red 'x' mark on the side, it will ask you if you wish to drop it, click the checkmark and voila, no more quest.
Other Information you might need
As of 2011, you can ask for help on Ask Hello Kitty Online on Sanriotown forums.
Conquering the Waves Minigame: Need Help? by Flowerfall - is now a guide to fix the flash mini game troubles, including Conquering the Waves minigame, started by Rikki.
The links below are listed for historical purposes
All of these are "currently" (August 31, 2010) active links, however, they may disappear at any time. This information needs to be migrated to a stable and more permanent location.
Quests/Mini-games
Gathering/Crafting
Gathering/Crafting Item List by Azurymber
Houses
Farms
Pets
The Pets Directory by honeydovey
Misc. Information
Shop Lists by Rikki
Game Masters
How to recognize a GM by GM_MorningBell
GM_MorningBell
